Thursday 29 November 2012

And He Scores..............


It was my nephew's 10th birthday on Monday and this is the card I made for him.  This card is cased from one I made for our neighbour Euan back in July.  The layout was kept the same but as Angus is a supporter of Celtic football team then green had to be the colour scheme for this one.  The card shape and layers were cut using Grand Nestabillities dies and the main image and football backing paper were taken from the Forever Friend's Collectors CD. The green spotty paper came from the Cuddly Buddly download A Patchwork of Papers Green and the green pearlescent card is from the Papeterie. 


The only change to the embellishments was the rosette under the sentiment on the front of the card.  The rosette was made using the green card and I think it took as long to get it flattened and stuck as it did to put most of the card together.  Not quite up to speed on this one yet.


On the inside a pyramid of footballs made with Quickutz die cuts made the stopper for the easel card.  The top two rows are raised on foam pads.


This is the birthday boy with the cake his Mum made for him.  I think I'd have a big grin on my face too if someone made a cake like that for me.


Thanks for reading today
Liz xx

I'd like to enter this card in the following challenges

Wednesday 28 November 2012

......Something Blue


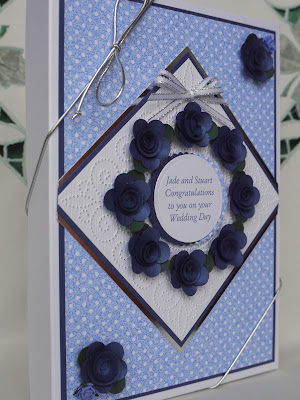
This is a card I made recently for Susan who, along with a few others, I meet once a month for a crafting session, cake and catch up.  Susan is struggling with her crafting at the moment and wanted a special card to give to her neighbour's daughter who gets married on the 1st of December.  I got the honour of making one for her and as per usual out came that shoe template again.  To find out what I use to make these cards you can check out this post.  I can't resist making this shoe card when a wedding or anniversary card is needed.  The wedding invitation colour scheme is navy and white so we went with this for the card and I added a softer blue shade too.


The paler shade of blue was added by using a paper from the Cuddly Buddly download A Patchwork of Papers Blue, self adhesive pearls from Hobby House and blue paper roses. I didn't have paper roses in a colour to match so I used Promarkers to colour white ones instead and this worked really will as ink soaked in easily.  The larger navy.roses were made using punched circles and quilling.


A matching box decorated using the same Ornare pricking template and quilled roses should keep the shoe protected and the inside of the box was lined with navy tissue to finish it off.


Here are the box and card together.  The personalised message on the box was created on the computer and cut using nestabilities dies and the sentiment on the shoe was stamped using a PSX stamp and embossed with silver embossing powder.


Unfortunately Susan is unable to atend the wedding on Saturday but hopefully she'll be able to meet up with us on instead for our December crafting meet.

Thanks for reading today
Liz xx  

I'd like to enter this card in the following challenges

Uplifting Birthday


This is an easel card I made for Heather who is a member of our Tuesday Crafting Bee group.

   
The main image on this one is the Penny Black stamp Uplifting Occasion and is coloured using Promarkers and Sakura glitter gel pens.  Heather is our glamour dust queen so her card needed to have a little sparkle somewhere.  The image was framed and layered using grand nestabilities labels four dies and nestabilities labels four dies were used to cut and layer the messages on the front and inside of the card.  I've had this stamp for some time but have never got around to using it. Recently I came across the Support Hope die by Die-namics and decided that it would make the perfect embellishments to go along with the stamp and making a card for Heather was the opportunity to put them together. 

 
The spotty and Happy Birthday backing papers are from the Cuddly Buddly download A Patchwork of Papers Plum.  Rich Razzleberry card and grosgrain ribbon from Stampin' up were used and the butterfly embellishments were cut using one of their sizzlits dies.  A few pearls from Hobby House and a couple of brads as stops were the the other embellishments used.


I can see this stamp and die combination being used again to make a few cheeky cards for female friends next year.

Thanks for reading today
Liz xx

I'd like to enter this card in the following challenges


Monday 19 November 2012

Paper Roses


My sister's mother-in-law had her eightieth birthday last week and this is the card I made for her.  The backing paper from the Nitwits Thimbles and Threads set was the inspiration for this one.  There are some beautiful backing papers in this collection.


An Ornare pricking template was used to create the base for the front panel and then it was layered on shades of pink card.  A sentiment, created on the computer, was die cut and layered using Spellbinders circle nestabilities dies and added to the centre.  The roses were created using a Marianne Creatables English Rose die.  After being cut and quilled Brilliance pearlescent coral ink was sponged over the top of the roses to colour the edges of the quilling.  The same colour ink was used to sponge around the scalloped edges of the base card.  The leaves were punched using an X-cut embossing punch but which colour to make them proved more tricky.  The colours in the backing papers are subtle and any solid green leaves looked too heavy against it.  These ones were punched from beige coloured card and the edges then sponged with VersaMagic Aloe Vera chalk ink.  A few self adhesive pearls from Hobbycraft and a bow made from Stampin' up's Pretty in Pink grosgrain ribbon finished the panel off.


The backing paper panels behind the front flap and on the inside of the card were embossed using the Regency Swirls 8x8 embossing folder from Crafters Companion.  The backing paper behind the front panel was left unembossed so that the panel had more surface to stick too.  It made a nice contrast to have the two different textures.


The sentiment and number embellishments on the inside were created on the computer and die cut, layered  and framed using Spellbinders nestabilities dies.


With a few more special "0" birthday cards to make in December I can see this one being cased as Christmas card fever strikes and panic sets in.

Thanks for reading today
Liz xx

I'd like to enter this card in the following challenges

Friday 9 November 2012

Silhouette Flower Variations


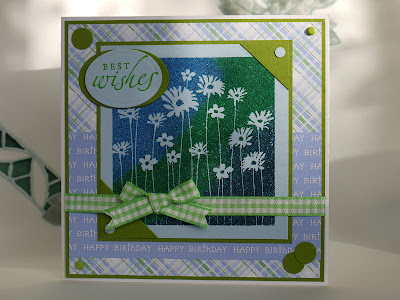
This is a card I've just finished off and about to deliver.  At one of our Saturday craft group meetings we set ourselves the task of choosing a stamp and seeing what different stamping techniques we could use with it.  The stamp I chose was the Hero Arts cling stamp Silhouette Flower.


In the card above the stamp was inked with VersaMark ink and stamped on to pale blue card.  Three different colours of Stampendous Tinsel embossing powders, Blue, Green and Aqua were scattered diagonally across the image and then heat embossed.  The backing papers are from the Cuddly Buddly download A Patchwork of Papers Blue. A Stampin' up sentiment stamp was coloured using a marker pen, stampedon to blue card and die cut using an oval nestabilities die.  Brads, gingham ribbon and punched circles were the added embellishments.
Here are a few of the other cards I made using this stamp.


To create the image on the left the stamp was inked with VersaMark ink, stamped onto glossy white card and heat embossed using white embossing powder.  When this had cooled a blue distress ink was sponged over and beyond the edge of the image.  The backing papers are from the Cuddly Buddly download A Patchwork of Papers Blue.

The card on the right has three different stamping techniques on it.  The top left square uses the same technique as the card on the left.  On the top right and bottom left squares the two blue backing card squares were stamped with the Stampin' up French Script stamp using two different types of blue ink. The Silhouette Flower stamp was inked with VersaMark ink, stamped over the top of the script and heat embossed using clear embossing powder.  For the bottom right square the stamp was inked with VersaMark ink, stamped on to blue card and then heat embossed using white embossing powder.


For this card the stamp was inked with Encore Metallic Blue ink and Stamped on to pale blue card to give a tonal effect.  The marble backing paper is from the Fred She Said Download Blue Pansies.


For the card on the right the stamp was inked with VersaMark ink, stamped on to pale blue card and then blue and green Cosmic Shimmer powders were brushed over it.


For this card the Silhouette Flower stamp was again inked with VersaMark ink, stamped on to white vellum and heat embossed using white embossing powder.  


This time the image was created by inking the stamp with VersaMark ink and stamping on to pale blue card.


The topper on this card was made by inking the stamp with VersaMark ink, stamping on to white vellum and then dabbing and brushing shades of blue and green chalks carefully over the top.


For this one the stamp was inked with VersaMark ink, stamped on to white card and then heat embossed using Stampendous Disco Black embossing powder.


And finally this one was created using one inch squares punched from all the pieces which were left over or where the technique didn't work first time. 

I enjoyed using this one stamp plus different types of card, ink and colouring mediums to create these different cards.  It shows how versatile one simple stamp can be.

Thanks for reading
Liz xx

I'd like to enter the first card in the following challenges

Thursday 8 November 2012

Filling the Blank


These are a couple of baby cards I made recently and posted about after baby Fraser was born.  One was left blank as although we knew Elaine's friend Danielle was due to have a baby boy we did not know what he was to be called until he made his arrival on the first of November.  Baby Harvey Thomas Brown arrived only a day after his due date weighing in at 7lbs 10ozs. 

Here's his completed card.


Here's a photo of the new arrival.


Thanks for reading
Liz xx

One Year On


This is an anniversary card I made for Elaine and Andy to give their friends Chris and Karen on celebrating their first wedding anniversary.  It hardly seems like a year ago that I wrote the post about making a wedding card for Chris and Karen and also the post on Elaine and Andy making and packaging the fudge for their wedding favours.  It's been a productive year for Chris and Karen as I recently made a baby card for them when their little boy Fraser arrived.


Purple was a colour theme at Chris and Karen's wedding so this plus hearts were used for their anniversary card.  An x-cut punch leaving the negative of two entwined hearts, a woodware punch punching out long shaped hearts and a Spellbinders nestabilities heart die were used to create the hearts along with a small heart embossing folder and self adhesive pearl hearts from Hobby House.  The first anniversary backing paper and personalisation were created on the computer.  Square plain and scalloped nestabilities dies were used to cut the square mounts for the hearts.

This verse was printed on the insert.

Today's your first anniversary
And we want you both to know
How much you're warmly thought about
As we hope this card will show
To celebrate this special day
Let's raise a glass or two
To wish the very best in life
Always comes to you.

Last weekend Elaine and Andy travelled down from Aberdeen and Chris, Karen and Fraser up from Newcastle to meet in Pitlochry to celebrate the anniversary and to meet the new arrival.  The scenery around that area at this time of year is spectacular with all the autumnal colours and Elaine has some beautiful photos some of which would make nightmare jigsaw puzzles with trees reflected in water with hardly a ripple.

Chris and Karen 


Karen and Fraser


Andy, Elaine, Karen and Chris


A blaze of autumnal colour.


A jigsaw puzzle nightmare


Thanks for reading today
Liz xx

I'd like to enter this card in the following challenges

Monday 5 November 2012

Vintage Ahoy There


This is batch number two casing the Ahoy There card I made back in July and has been made using shades of brown to create a more vintage feel this time.  The brown card stock is from the Papeterie and the striped backing card is from Kanban.  Stampin' up inks and ribbon were used in their chocolate chip and crumb cake colours and once again the Grande Dots 8" x 8" Embossalicious embossing folder from Crafter's Companion was used to add texture to a backing layer.


This is a picture of the Hero Arts stamp which was used to create the backing layer for the front of the card and also to decorate the insert. 


These two cards are for two uncles who celebrate their birthday this month.  

Thanks for reading
Liz xx

I'd like to enter this card in the following challenges
Here Come the Boys Challenge 39 - Die Cuts and Punches
Inky Impressions Challenge 83 - Lots of Layers
Fab'n'Funky Challenge 145 - Die Cuts and Punches
Lady Anne's Stamp Challenge - Anything Goes
Ladybug Crafts Challenge 3 - Monochrome/Tonal
Moving Along With The Times Challenge - Stitch Up
Do You Stack Up Challenge 96 - Brads
Fairy Tale Challenge 53 - Monochrome,Dies and Punches
Allsorts Challenge 179 - For Men Only
Penny Black and More at Allsorts November Challenge - Any Die Will Do
Challenges 4 Everybody Challenge 6 - Anything Goes
Come and Get It Challenges - Monochromatic Sunday
Gingerloft Challenge 51 - No Colouring Allowed
Cards for Men Challenge 23 - Anything Goes 
Kaboodle Doodles Challenge 144 - Anything Goes
Make It Monday - Anything Goes

Saturday 3 November 2012

Monochrome Ahoy There


A friend's son celebrated his birthday on the first of this month and this is the card I made for him.  It's cased from this one but has been made using Stampin' up's inks, card, ribbon and patterned paper in their colours Marina Mist and Pacific Point instead of the nautical red, white and blue of the original one.

Once again the Hero Arts stamp Vintage Map was used to create a backing paper using the stamp-a-ma-jig from Stampin' up to align the images.  The edges were then distressed and inked to give the effect of an old map and a stitched border was added to give an extra frame.  The same stamping technique was used to decorate the edge of the insert.

To compliment the spotted paper, and also to add texture, the pale blue backing card was embossed using the Grande Dots Embossalicious 8" x 8" embossing folder from Crafter's Companion.


I find male cards quite difficult to make so tend to batch make if there are a few birthday's close together.  As I've also got three uncles with birthdays quite soon I've made a couple of these cards in this blue colour scheme and a couple more with a vintage feel.


Thanks for reading
Liz xx

I'd like to enter this card in the following challenges