Friday 30 August 2013

Turquoise 40th

There seems to be a lot of special birthdays amongst family and friends this year and this is a card I made for a cousin's 40th birthday back in July.


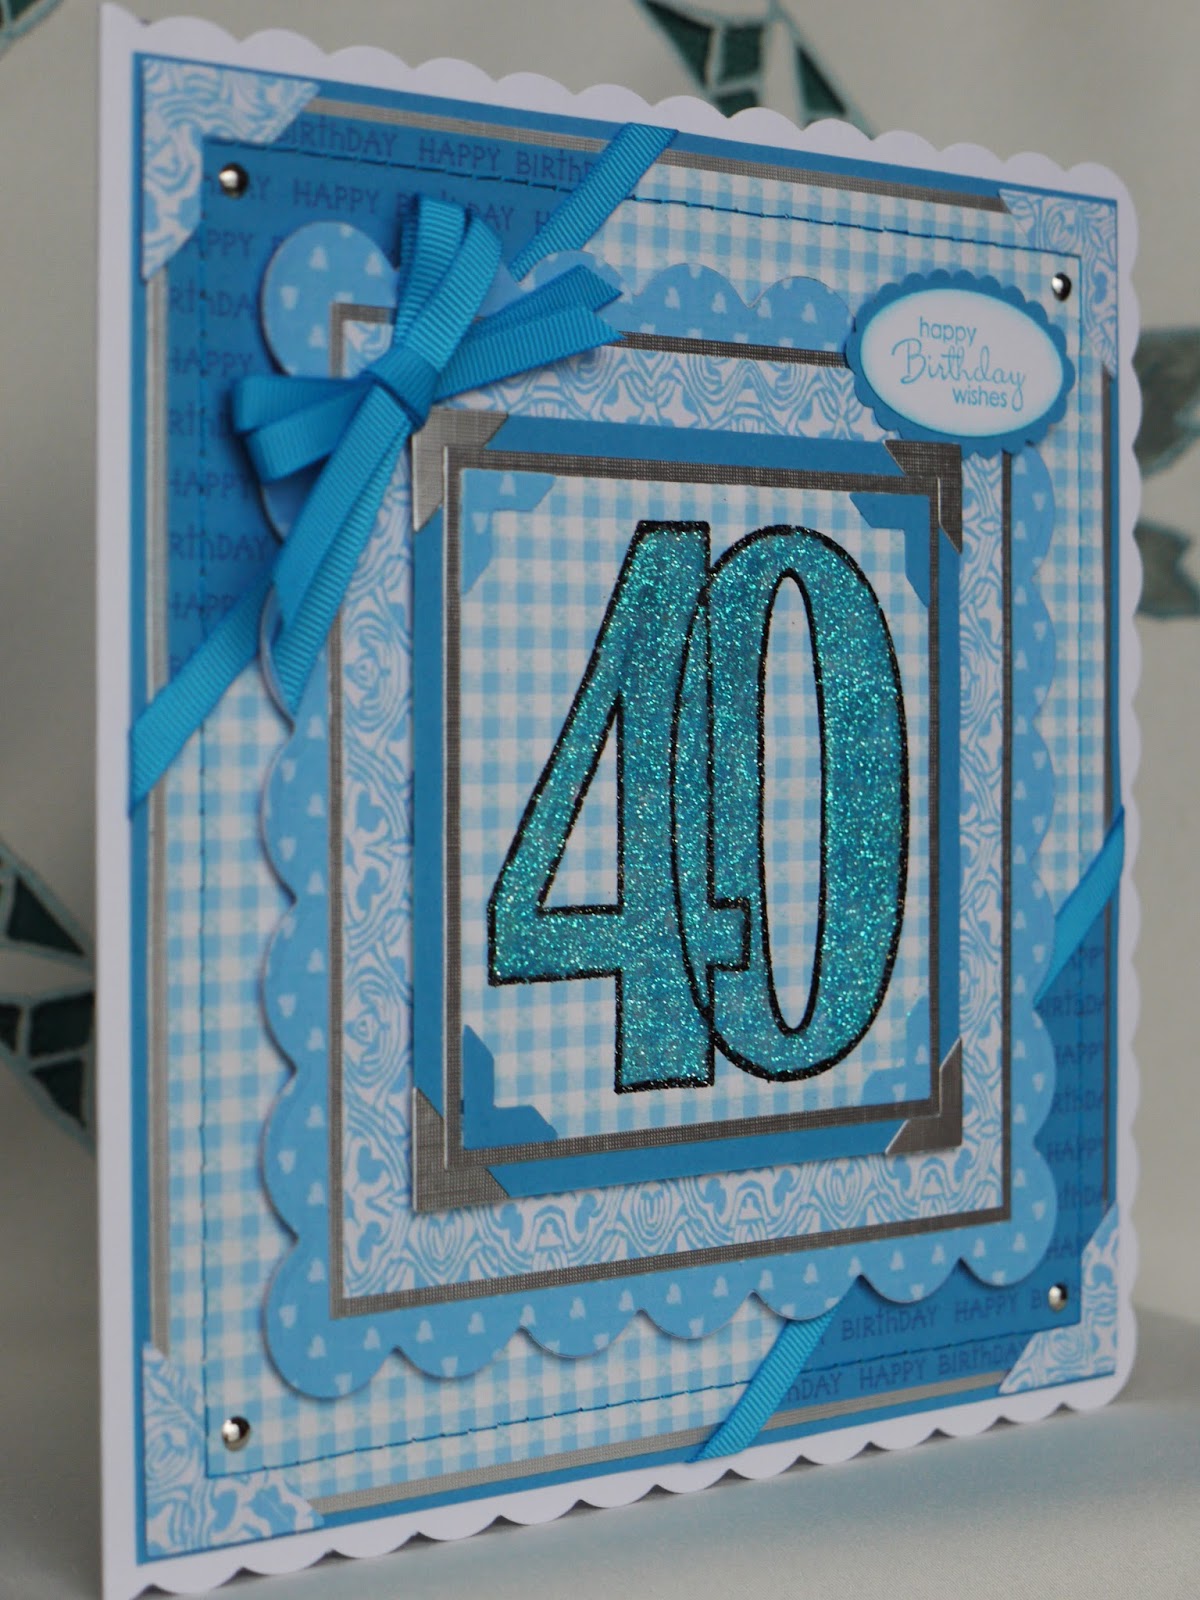
Having used the Woodware 18th and 21st stamps to make to make birthday cards this year I then invested in a set of clear Papermania number stamps so that the same effect could be created on a card for any age. It's a great set of stamps to have if you just want to focus on the age or if you're not sure what the person's particular interests are to personlise their card for them.  The 4 and 0 stamps were stamped using Versamark ink and then embossed using Stampendous Disco Black embossing powder.  The number 4 was stamped and embossed first and then, using Stampin' up's stampamajig to help with positioning, the 0 was stamped over the top.  Having an embossed outline makes it easier to keep the glue inside the number outline when it comes to adding glitter. Once this had set the forty was die cut using a square Spellbinders die and the insides of the numbers were filled with turquoise glitter.  The card curled because wet glue had been used on it but putting it under a pile of books flattened it out again before it was added to the card.


The papers for this one were from The Cuddly Buddly Cottage Collection download in The Duck Egg colourway and also the Happy Birthday paper from their Patchwork of Paper Blue printed on  to turquoise cardstock.

The card was put together in three tiers with the two top tiers raised on foam pads. A border of stitching was added to the bottom layer to add and extra frame.  Large and small corners cut using Quickutz dies were added to different layers on the card.

The sentiment was stamped using a Stampin' up stamp from the Petite Pairs set and their Tempting Turquoise ink and then punched and layered using their plain and scalloped oval punches.  Tempting Turquoise grosgrain ribbon was used to wrap around the corners of the bottom layer and to add a bow to the middle layer.  Round silver brads were the final embellishments.


There are still two 18th, two 40th, a 50th, a 65th and two 70th birthday cards to make before the end of the year so these stamps are going to be a good investment.

Thanks for reading today

Sunday 25 August 2013

HB2U

To start this post I need to say thank you to my two newest followers.  Hopefully you'll enjoy future postings or browsing through past ones.

This card was for a friend's son who turned seventeen back in July.  Fraser plays the guitar and is interested in music so I used this as the theme for a HB2U rock star birthday card.  Three different sheets from the DCWV Rock Star Paperstack were used as the backing layers along with black and white card and holographic and linen effect silver cardstock.


On the bottom layer the stamp You Rock from the Inkadinkado clear stamp set Rock Star was stamped with VersaMark ink and embossed using Stampendous silver detail embossing powder.  Silver metallic thread was used to stitch a border around the layer and corners cut using a Quickutz die were layered up on two of the corners.  Little silver peel off stars were added around the stamped sentiment.

The middle layer had a star theme taken from the silver foiled backing sheet.  Stars were cut and layered using a red Sizzix die and a Quickutz framed star die.  A star embossing folder was used to emboss stars cut from the linen effect silver cardstock and silver star brads were attached to each corner of the layer.  The same dies were also used to cut stars to add to the top right corner of the bottom layer .

The top layer was the HB2U topper made using a silver foiled skulls backing sheet.  The corners were punched using a Woodware corner punch and silver metallic thread was wrapped around the topper.  The HB2U sign was made using Sizzix sizzlits dies.  The letters were cut twice and layered to give a shadowed effect and the negative from the die cut was used for the 2.


To finish off a silver elastic cord was tied around the fold of the card.

Thanks for reading today

Owl Card Kits

In the last post I wrote about going to see my niece Leanne and her family whilst they were on holiday in Inverness.  Before setting off I had fun making up a goody bag of knick knacks for Leanne and her brother Angus so that they would have something to do if there was a rainy day during their break.  Leanne likes crafting with her Granny, especially using her Promarker pens, and she also has an owl necklace she frequently wears so I combined the two and made up a little card kit for her using Stampin' ups build an owl punch.  I've had the punch for some time and not used it so I had some fun too.  Below are photos of the cards in the kits which I pieced together to take a photo to include in the kit so that Leanne had an idea to work from.


The patterned papers are all from various Nitwits Collections and the woodgrain paper is from a Pink Petticoat Collection.
I thought the cards could be made up as thank you cards for her birthday presents but I also included a birthday sentiment for each one so that she could have the option of using them for birthday cards too.  Extra owl bits were punched so that she had some to make up something of her own at home.

Thanks for reading
Liz xx

Friday 23 August 2013

Leanne turns Thirteen

The glorious twelfth was the thirteenth birthday of my niece Leanne and this was the card I made for her.  She spent her birthday on holiday in Inverness with her family and, although the card ended up being a couple of days late, this year I was able to go and deliver it personally.


It was the patterned papers which decided the colour scheme for Leanne's card and these were from a Hot off the Press paper pad which came in a QVC kit many moons ago.  The main image is a digital stamp from Saturated Canary called Honey and she was coloured in using Promarker shades to match the papers.  Glitter was added to the heart on her t-shirt and the frills of her petticoat.  To add an extra frame to the image blue thread was used to stitch a border around Honey before she was layered on to blue and pink card.  Two of the backing panels also had stitched borders.


A stamp from Stampin' up's Petite Pairs and their chocolate chip ink was used to create the sentiment and it was then punched and layered using their oval and scalloped oval punches.  Their one inch and three-quarter inch punches were used to make the layers for the number 13 which was die cut using a Quickutz die.  Bashful blue ink was sponged around both and also the scalloped edges of the base card.


The bunting was made using La La Land's Heart Banner die.  It was cut in four different colours of card and then pieced together to make this banner.  Left over hearts were also added as embellishments.  Pink self adhesive pearls from Hobby House and ribbon from Papermania, which had been a freebie in a craft magazine, were also added to the card.  A mixture of old, new and freebie items came together to make this one.


There was a double insert inside the card.  Blue gingham paper from the Cuddly Buddly download A Patchwork of Papers Blue was the outside layer and a verse printed from the computer on to white paper was the inside layer.

Below is a picture of Leanne wearing the 13 badge I had tied to her card.  


Although we didn't manage to meet up on Leanne's birthday we all had a lovely day out with her family at the Highland Wildlife Park, Kingussie instead.  This is Leanne with one of the safer animals we came across that day.


She even created one of her own.


Thanks for reading today
Liz xx

I'd like to enter this card in the following challenges


Wednesday 21 August 2013

A New Teenager

Last month our neighbour Euan turned thirteen and this is the card I made for him.  Although he has musical talent he's also a very sporty young lad and I decided to go with this theme for his birthday card as he'd recently been named player of the year for one of the local football teams.


The patterned papers came from a masculine themed pack from Dovecraft and they also dictated the colour scheme.  Sometimes you have a good idea how you want a card to turn out and sometimes it just evolves as it goes along and this was one of those evolving cards.  The inspiration started from the card below made by Alina.  I always get stuck with making masculine cards but when I saw this one I liked how a general HB2U card could be personalised with embellishments.  For Euan's card I used Quickutz dies to cut out a football, football boots, a framed star and the number thirteen.  Two football brads were also added.


The HB2U sign was made using Sizzix sizzlits dies.  The letters were cut twice and layered to give a shadowed effect and the negative from the die cut was used for the 2.  The corners of the sign was punched using a Woodware corner punch, gold thread wrapped around it and gold brads added to the corners.  Gold thread was also added to one of the other backing layers.

It was whilst setting out the different layers to decide where to place them that the card started to evolve as I realised that Euan's name could also be worked in to the layout linking in the letter U.  Carrying on the star theme from a backing paper and embellishment more stars were cut using a Sizzix red die and then layered with one inch circles punched, layered and added on top.  The other letters of Euan's name were cut using Quickutz dies and added to the centres of the circles.


The final touch was tying gold elastic cord around the card and a very personalised card was completed.

Thanks for reading today
Liz xx

I'd like to enter this card in the following challenges
Crafty Sentiments  Challenge - Colourful

First Birthday for Fraser

Fraser is the son of Andy and Elaine's friends and he celebrated his first birthday on Sunday.  It doesn't seem so long ago that Elaine and Andy were making fudge for the table favours at his Mum and dad's wedding and here is their little fellow aged one already. This is the card I made for him.


The main image was stamped using the Penny Black stamp Balloon Teddy and was coloured using Promarkers. It was then framed and layered using Spellbinders plain circle nestabilities dies and a quickutz die was used to cut a number one to add to the balloon.  A quickutz die was also used to cut the corner embellishments.


The patterned papers were from the Cuddly Buddly download A Patchwork of Papers Blue which I think must be my most used set of digital papers.  Green thread was used to stitch a border around the papers to add an extra frame.  A stamp from Stampin' up's Petite Pairs was used to create the sentiment and it was punched and layered using their plain and scalloped oval punches.  Their Old Olive grosgrain ribbon was also used for the bow and across the card.  The final embellishments were three little green brads.


Thanks for reading today

Saturday 10 August 2013

100 and 103 Years Young

These cards were orders I received for a lady's Aunts, one who was to become 100 and the other had already turned 103 earlier this year.  This was another opportunity to make the box of roses cards.  Aunt Ina likes purples and lilacs so papers from the Nitwit Collection Time for Tea were used for this one.


For the other card papers from the Nitwit Collection Always and Forever were used.


Both cards together.


Thanks for looking in today
Liz xx

Thursday 8 August 2013

Matching Birthday Card

As well as it being my friend's anniversary on the first of July the following day it was her birthday and for this I made a box of roses card to match the anniversary card I'd given her.


The colour scheme for both cards was based on the Pink Petticoat Isabelline collection of papers.  Matt, pearlescent and metallic gold card along with yellow, grey parchment and black card were used to compliment the patterned papers.  The box sat on an 8"x8" card and was raised up on foam pads.  The parts of the lid which didn't overlap the box were on double layer foam pads.  More dimension was added to the card with the addition of the rolled roses which were made using the Marianne die English rose die.  This can be seen from this side view of the card.  The leaves for the roses were punched from gold linen effect card using an X-cut beech leaf embossing punch.


The gift tags were cut using a Sizzix red die and the top tag was embossed using one of Stampin' up's
textured impressions designer frames.  The sentiment inside the frame was made using a stamp from their Sincere Salutations set and punched out and layered using their large oval punch.


On the inside there was a double insert.  The outer one was plain white and the inner one was made using patterned paper on the left with a small strip of the same patterned paper decorating the edge of the right side.  The verse was created on the computer and printed on to white paper.


This is a photo of my friend and I taken at a family celebration back in May.


Thanks for reading today
Liz xx


Yellow Anniversary Roses

My friend and her husband celebrated their anniversary on the first of July and this is the card I made for them.  Their anniversary treat was a trip to London to see Michael Buble perform at the O2.


The colour scheme for this one was based on the Pink Petticoat Isabelline collection of papers.  Matt, pearlescent and metallic gold card along with yellow, grey parchment and black card were used to compliment the patterned papers.  

The card was made in two tiers.  The top tier had matt gold card as it's base and on top of this was a layer of grey parchment card which had been paper pricked using an Ornare stencil.  Using the pricked design as a guide, leaves punched from gold linen cardstock were glued on in pairs.  Attached at the base of each pair of leaves were yellow and matt gold rolled roses which had been made using the Marianne English Rose die.  Little paper rosebuds were glued in between the paper roses.

  
The sentiment was created on the computer and printed on to patterned paper and then framed and layered using Spellbinders plain and scalloped circle dies. This was then attached to the centre of the topper using foam pads to raise it up.  Foam pads were also used to attach the top tier to the bottom.

The bottom tier had layers of gold pearlescent card, black card and the patterned papers.  Small black corners cut using a Quickutz die were added to two of the corners.  The usual embellishment of ribbon along with gold brads were also added.


Below is a photo of my friend and her husband which was taken at their son's engagement party in May.  Hopefully she won't see this or it could be the end of good friendship.  Although they say the camera never lies we've both reached the stage where we don't like what it's telling us.


Thanks for reading today
Liz xx 

Wednesday 7 August 2013

Butterfly Girl

Two days after our Ian celebrated his birthday it was the turn of his girlfriend Emily to celebrate hers and this is the card I made for her.


Stamps from the stamp set Butterfly Beauties by Aspects of Design (The Stamp Man) were used to make the toppers.  The main image was stamped onto lilac parchment card using VersaMark ink, heat embossed using Stampin' up's heat and stick powder with purple glitter being added while the powder was still tacky and then heat embossed to set the glitter.  The same method was used on scrap card to create the glittered flower embellishments.  Once the image had cooled Encore purple metallic ink was sponged over the image to create depth.  Spellbinders Grand nestabilities circle dies were used to create the frames for the image.


The three little toppers were made using a smaller version of the main image.  They were stamped with Encore purple metallic ink on to lilac parchment card and then die cut and layered using Spellbinders plain circle dies.  Purple metallic ink was sponged around the edges of the die cut images  and also the scalloped edges of the base card. These little toppers were attached to the card using foam pads.

A stamp from Stampin' up's Petite Pairs set inked with Versamagic sea breeze ink was used to create the sentiment.  Their plain and scalloped oval punches were used to punch out and create the layers for the sentiment.

It was back to a Nitwit Collections for the patterned papers and these ones are from their Promises Collection .  They were a good match to Stampin up's island indigo and baha breeze cardstock which were used for the backing layers along with shades of purple card.


My usual embellishments of ribbon, bows and crystal dot peel off stickers were added along with flower embellishments which were punched from scraps of card using the Tonic little flower punch.

On the day I found a coke bottle with Ian's name on it I also found one with an Emily label and couldn't resist buying it to include in her birthday present.


 Here's a lovely photo they took of each other during one of the glorious days we've had this summer.


Thanks for reading today.
Liz xx

I'd like to enter this card in the following challenges
Addicted-to-Stamps Challenge 61 - Wonderful Wings
The Ribbon Girl August Card Challenge - Birthday
Really Reasonable Ribbon Challenge 77 - Things with Wings Theme
Flutter By Wednesday Challenge 247 - Any Winged Creature

Monday 5 August 2013

A Visit to Castle Fraser

No cards today as I'm sharing photos from another of our outings to one of the NT properties in the area instead.  This one was to the grounds and garden at Castle Fraser.  As you can see from the photos that although it was a breezy day it was also a glorious one with hardly a cloud in sight.  The first four photos show the outsisde of the castle.


The next set of photos shows a view of the castle from the garden and then some shots of flowers in the garden.


A few weeks later our Elaine and Andy attended an events day at Castle Fraser and here is a link to a  short video made by Elaine of some of the entertainments including the Knights of the Damned.  The video includes highlights of the jousting event and also features SMJ Falconry, Medieval Realm and Andrew Balmforth from the Leeds Royal Armoury.


This was a photo she took on the day but I don't think this Knight's trophy is historically correct.  Apparently there were more than one of these trophies won during the day.  Must have been the hot weather that forced them to surrender their armour.

Thanks for reading today
Liz xxx