Friday 31 March 2017

Spring Tag

Keeping with the Spring theme from the last post, this is a decorated tag made for our craft group's tag challenge for March. A few of the ladies in the group had made tags for online classes and Tim Holtz's challenges so we decided to set our own tag challenges for each meet this year.  A Spring/Easter theme was chosen for March and the inspiration for my tag came from the daffodils which had recently bloomed in the back garden.


Using My Craft Studio and the Nitwit Collection Daffodil Joy, a backing paper and elements were sized and arranged to make a base layer for the tag.  Extra daffodil flowers were printed to cut and decoupage to add dimension.  Neutral coloured thread was looped and added between the daffodil layers and a yellow button added to the centre.  The message on the paint chip element was particularly fitting and added to it were daffodil stickers which had been a magazine free gift.


The first lines of Wordsworth's poem Daffodils were printed and die cut using Joy Crafts cloud dies. Green ink was sponged around the clouds and green clouds matted behind.  The daffodil embellishment was from a Create and Craft button stash I'd bought many moons ago and it had finally found it's purpose.


Other additions to the tag were pink self adhesive pearls and pink gingham ribbon, picking up the pink on the paper elements, and lemon grosgrain ribbon.

Hope you enjoyed my little bit of sunshine today.
Liz xxx

I'd like to enter this tag in the following challenges


Wednesday 29 March 2017

Spring Colours for a Spring Birthday

The card in this post was made a couple of weeks ago for a grand-niece's birthday. The topper had been lying coloured and unused for a long time and, although the colour scheme isn't one I'd normally use, it seemed right for a Spring birthday card. The image is Whispy from Krista Smith's Saturated Canary collection and is coloured using Promarkers with Crafters Companion glitter spray added to the wings and dress.

Spellbinders dies were used to cut a rectangle and circle frame for the topper and behind those were added two rectangle matts which were embossed using a random dot folder. 


Spotted backing paper, buttons and ribbon from the Sunshine Papermania Capsule Collecton were used and the yellow Happy Birthday paper was printed from the Cuddly Buddly download A Patchwork of Papers Yellow. The two patterned papers were taped together and die cut using a Sue Wilson pierced square die, then taped to the backing card and the pierced border stitched using an orange thread. 


At last month's craft group meet we were commenting on having lots of flower embellishments in our stash and pondering on ways we could use them.  On Jenna's card I've managed to use up some of mine including paper flowers, mulberry roses and buds, flower buttons and a few little layered up flowers punched using a Tonic punch.  Orange ink from a felt pen was sponged on the edges of some of the flowers.  To the centres of the flowers buttons, flat backed pearls, brads and crystal sticker dots were added.

Little white adhesive pearls were added amongst the flowers and gold leaves, cut and embossed using the leaf die from the Marianne English Rose die set, were added behind the flowers.


Jenna's name and age were added to the card to personalise it for her. Alphabet stickers were added to half inch circles, punched out using Stampin' up's half inch punch and sponged with orange ink, and her age was die cut using Marianne number dies.  Spellbinder circle dies were used to cut the layers behind the flower embellishments and the number eight.


Other embellishments added to this card were a few larger crystal sticker dots added to corners and an entwined heart which was amongst a bag of buttons I bought from Create and Craft many moons ago when Alan and Barry were at the helm.

Hopefully Jenna enjoyed receiving her Spring card as much as I enjoyed making it.

Thanks for reading today

Monday 27 March 2017

Baby Jack

The last three posts have been about wedding cards made for a friend's son and his bride but the card in this post was created to mark the arrival of Niall and Steph's baby son.  Back in January they were thrilled to announce the arrival of Jack, the first member of the next generation of this branch of the Campbell family and I made this keepsake to mark his birth.


Lots of different makes of dies were used to put this accordion card together.

Sizzix Bigz dies were used to cut the base card, the layers and the frames for each section of the card. The patterned papers used for the layers and frames were printed from the Cuddly Buddly download - A Patchwork of Papers Blue.  
Quickutz dies were used to cut the rabbits and the cardboard buttons.
Spellbinders labels 1 dies match the outline shape of the Bigz layer and frame die so they were used to cut smaller frames and the boards the rabbits are holding.  Spellbinder star dies were used to cut the star embellishments and a Spellbinder oval die cut was used as the body for the rabbits.
Marianne dies were used to cut the baby feet and the letters to spell BABY JACK.

Encore Metallic blue ink was sponged around the edges of some die cut pieces and along with ribbon, heart buttons and a little coral pink chalk added to the cheeks of the rabbits this finished off the card.

The next photograph shows most of the die cut pieces ready for assembling and the following one shows the decorated base card and the embellishments ready to attach.


The depth of the card meant that a box was needed to protect it and to complete the project a matching gift tag was made for the present.


The little photograph of Jack was taken as he was about to head home from the hospital and it looks as though he's waving goodbye to the nurses.  He's growing fast and is a delight to his mum and dad.

Thanks for reading today
Liz xxx

I'd like to enter this card in the following challenges

Saturday 25 March 2017

Wedding Hat Trick for Niall and Steph

The previous two posts have shown cards made for a friend to give her son and his bride on their wedding day but this post shows the card which we gave them.  I've made this card several times, in different colourways for weddings and anniversaries, but this one was personalised for Niall and Steph as it included their names, initials, wedding details and was trimmed with a Campbell tartan ribbon which is the family surname Steph took after her marriage to Niall. 


Shades of green and navy blue pearlescent card were used to build up the layers on this card and the yellow roses picked up the the yellow stripe in the tartan.  The green linen effect backing paper was printed from Joanna Sheen's Secret Garden CD and the silver wedding script paper is included in a download available from Printable Heaven.


If you'd like to know how this card was put together then check out these previous posts to find out what was used.  Extra embellishments used on this one were die cut rose leaves, using a Joanna Sheen die, and flower stamens added under the yellow roses.


A poem about marriage was added to the back of the z-fold and on the inside a wedding verse and the wedding day details were added.


As you can see from the wedding details it's taken me a few years before getting around to posting about Niall and Steph's wedding cards and they've already moved on to the next major step in their lives.  All will be revealed in the next post.

Thanks for reading
Liz xxx

I'd like to enter this card in the following challenges

Wednesday 22 March 2017

Wedding Card for Niall and Steph

The previous post was about a wedding card made for a friend to give her daughter-in-law on her wedding day and this next card is the one I made for her to give the happy couple.  The inspiration came from this one, which my friend found on the internet, and fortunately I already had some of the craft tools to make a larger version of it for her.


The coloured backing paper for this card was printed from the linen backing papers on Joanna Sheen's Secret Garden CD and the wedding script background is part of a download pack from Printable Heaven and printed on textured white pearlescent card. 


The "To Have and to Hold" sentiment was stamped and embossed with silver detail embossing powder and die cut using a Spellbinder's deckled edged die.  This was the first use for a wooden stamp which I'd bought when I started crafting about thirteen years ago.  

The message forming the stop for the easel card was printed from the computer and also die cut and layered using the deckled edged dies. Brilliance orchid pearlescent ink was sponged around the edges of both the sentiment and message.


The flower embellishments were from a mulberry flower starter kit from Wild Orchid Crafts with the addition of a few small rose buds.  The cream flowers were sponged with Brilliance orchid pearlescent ink and they and the large rose were glittered with Stampin' up dazzling diamonds glitter.


Other embellishments added to the card were single self adhesive pearls and gem stones, flat backed coloured pearls, a silver heart charm, a silver wedding and engagement ring and a large self adhesive gem stone embellishment from Creative Expressions.  This was the first time I'd used one of these large embellishments and I was glad I'd bought two as the first one I attempted to use ended up in a tangled mess.


The depth of this card meant that a box was needed to protect it and the decoration for this was based on the card front.  Matching metallic elastic cord was wrapped around the box base and lid to hold them together.


This is one of the few photos we managed to capture of the happy couple on their special day.

Thanks for reading today
Liz xxx

I'd like to enter this card in the following challenges

Tuesday 21 March 2017

Wedding Card for Steph

Back in 2014 a friend asked me to make wedding cards for her to give to her future daughter-in-law and also for her son and his bride.  This was quite an honour as she chooses cards carefully both for their visual impression and the message within.  Fortunately she looked through various designs on the internet and came up with two designs for me to work from and this is what was made for Steph, her daughter-in-law to be.


The backing layers were made using shades of cream plain, textured and pearlescent card and the main background piece was embossed using a Crafter's Companion embossing folder.

The floral corners were made up using a flower kit from Wild Orchid Crafts along with mulberry roses and rosebuds.  The cream flowers were sponged with Brilliance pearlescent ink and they and the large rose were glittered with Stampin' up dazzling diamonds glitter.


Marianne dies were used to cut the backing layer for the sentiment, which was printed from the computer, the decorative edges of the layering strip which went across the card and to cut leaf embellishments to tuck under the flowers.  Some of these leaf embellishments were also glittered.  

Marianne Craftables - Circle and Flower Stitch - CR1248
Marianne Craftables - Border Stitch - CR1250
Marianne Creatables - Anja Leaves - LR0226


Other embellishments added to the card were self adhesive pearls, pearl stick pins, cream grosgrain ribbon, metallic elastic cord tied around the card and pearl ribbon sliders.


Inside the card was a personalised message, written in verse, from my friend to her daughter-in-law to be.  The flower embellishments created a depth on this card so a box was needed to protect it and the design on the box lid was based on the card front.


Here is a picture of Steph on her wedding day, just before she went to join her bridegroom to become Mr and Mrs..  She was a stunning bride on the day and smiled and shone the whole day through.


Thanks for reading today
Liz  xxx

I'd like to enter this card in the following challenges
Marianne Diva's Design Challenge 15 - Anything Goes - Pearls and Diamonds Option
International Art and Soul Challenge 4 - Embossing
Crafting from the Heart Challenge 151 - Anything Goes
Paper Nest Dolls Challenge 3 - Anything Goes
Crafty Calendar March Challenge - Mum's Day/Special Female
Scrap and Craft Challenge 1 - Celebration
Crafting with Friends Challenge 39 - Anything Goes
Creative Fingers Challenge 126 - Anything Goes

Wednesday 8 March 2017

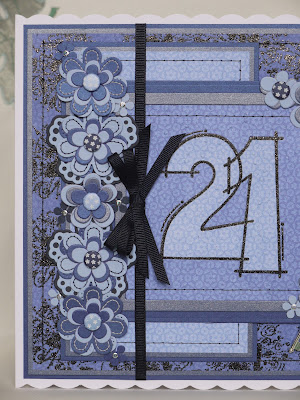
Woodware Big 21

Back today with another Woodware favourite and it's the big number stamp 21 this time.  This card was sent off to a friend's daughter in Wales.  This card is great to use for either male or female cards as you can see in this earlier post and this post.


The three shades of blue patterned papers used to make this card are from the Nitwit collection Snow Princess solids.

The flowers were die cut and layered using the following Marianne dies with Craftworks Card candi added to the centres.  The smallest flowers were punched out using a Tonic small flower punch with crystal stickers added to their centres.

Marianne Collectables COL1323
Marianne Creatables Tibbon Flower 3 LR0110
Marianne Craftables CR1248


The number 21 was stamped and embossed on to the two palest patterned papers using VersaMark ink and Disco Black embossing powder from Stampendous.  The palest one was cut out and paper pieced on to the darker one to make the main topper.  The topper was then dry embossed using the Cuttlebug Falling Snow embossing folder.  This seals the paper piecing to the topper and adds texture.  The topper was then framed and layered using Spellbinders Grand Nestabilities Plain Square dies and a stitched border was added inside the frame.  


A stitched border was also added to the other backing panels.  On the main backing panel a 21 stamp from Personal Impressions was used to add a border around the edge.  VersaMark ink and Disco Black embossing powder were also used to add this.  Small silver keys, navy grosgrain ribbon and brads were added as embellishments.


A co-ordinating money wallet was made using the left over pieces of paper and card.  The bow attached to this was made using a Sue Wilson die set.

Thanks for reading today