Friday, 29 March 2013

Stampin' up Class

Last Saturday Carol organised a Stampin' up class for us which involved making eight cards from six sheets of A4 card.  This class showcased lots of the Stampin' up products, covered lots of different techniques and resulted in a set of cards for various occasions being made.

The idea for these cards comes from Connie Stewart's Simply Simple Stamping blog and she calls her technique Simply Simple Flash Cards as they are made in a flash.  Check out Connie's blog to see how some of these cards are made and also other examples using this technique. Also check out this You Tube link to hear her explain how the eight cards from six sheets of A4 is possible.  The measurements Connie uses are based on American card sizes and need to be adjusted to the A4 size we are used to.


Here are close up views of each card.


Although it hasn't shown up in the photograph the card is embossed using the new clouds effect embossing folder.


This is a really pretty dimensional card.


The recessed butterflies on this one were so effective.


You really need smelly vision for this card as we used vanilla embossing powder to create the background for the bird.  The room was smelling rather nice after we had finished making it.


The sentiment on this card was embossed using white embossing powder and none of the detail from the message was lost.  Another really pretty card.


The bow tie for this card was very cleverly made using two punched out ovals, a strip of black card with V shaped ends and a waist in the middle and a small strip of black card to wrap around the waist to hide the oval ends.  Really effective.


It was a full on afternoon of crafting which was paused only by a refreshment break when Carol made us pancakes to have with our afternoon cuppa.  We also enjoyed pieces of birthday cake which Lynn had brought along to share from her special "0" birthday.  

At the beginning of February Carol had an open day at her house to showcase this year's Sale-a bration items from Stampin' up and this was the make and take available for us to put together on the day.  The little thank you card was made by Carol and attached to my order when it arrived.

I hope you've enjoyed looking through the cards we made and that you'll head over to Connie's blog to see some more of her inspiration.

Thanks for reading today
Liz xx

Thursday, 28 March 2013

Easter Book Cards


These are two book cards I've made for my nephew and niece for Easter.  The toppers and decoupage for these were taken from a Create and Craft card kit and each book used two identical cards and their decoupage.  

 Angus's Book Card


The fronts of the kit cards and decoupage were used to decorate the front of the book card and the framed area on the inside.  On the front the topper and layers were cut using nestabilities and grand nestabilities oval and scalloped oval dies.  The first two layers were raised on foam pads to allow a ribbon to pass through and wrap around the book.  The sentiment on the front was printed from the computer and punched out using Stampin' up's oval and scalloped oval punches.


The images from the back of the kit cards were also cut and layered using oval dies.  On the back of the book card the topper was attached using foam pads to allow the ribbon to pass through and wrap around the back of the book card.  The ribbon was tied in a bow at the side edge to hold the book card together and to keep the chocolate rabbits from escaping from inside the frame.

Leanne's Book Card


The image from the back of the kit card was also cut and layered to decorate the inside of the front cover and underneath that a little pocket was created using up strips of card left over from decorating the book.  In the pocket is a printed and die cut message attached to a tag cut using a red Sizzix die and there's also some Easter holidays spending money tucked in there too.

It's a year ago since I made my first book card and my inspiration came from a posting on Lisa's blog Wishcraft where she'd made a Mother's Day book card and had supplied the link to where she had found a tutorial to make it. If you follow this link you'll find the measurements and instructions to make the cover and frame for the book card.  The decorated strips around the box frame on this card were punched using a Martha Stewart border punch.

The yellow gingham backing paper was from the Cuddly Buddly download A Patchwork of Papers Yellow and the linen effect card and glitter card were from Create and Craft card packs.


Easter egg stickers, punched flowers made using the Tonic small flower punch and crystal dot peel offs were the little extras added before sending these off in the post.  Hopefully Leanne and Angus will get to enjoy the chocolate bunnies as they had a mystery chocolate eater in their house after Mother's Day.  Their Mum opened a box of chocolates and during the next twenty four hours most of them disappeared.  Nobody owned up but I think Angus gave the game away as he was just a bit too quick to suggest that it must have been the bogeyman.   Let's hope the bogeyman doesn't catch up with Angus.

Thanks for reading today and wishing  you a good Easter weekend.
Liz xx

I'd like to enter these book cards in the following challenges
Crafty Creations Challenge 115 - Easter
The Sisterhood of Crafters Challenge - Easter/Spring
Crafty Sentiments Challenge - Easter
Creative Craft Challenges 2 Challenge 6 - For the Kids
Going Grey With Scrap-Creations Challenge GGSC 149 - Easter
Tuesday Throwdown Challenge 140 - Make Something Dimensional
Use It Tuesday Challenge USE052 - All About Spring (Cards from Card Kit)
Cutie Pie Challenge 40 - Easter
Kaboodles Doodles Challenge 164 - Easter/Early Spring
The Squirrel and the Fox Challenge 40 - Easter or Passover
Cupcake Inspiration Challenge 203 - Easter
2 Sisters Challenge 136 - Easter/Spring
Crafty Calender March Challenge - Easter Eggstravaganza
My Sheri Crafts Challenge 106 - Easter
Speedy Fox Challenge 152 - Bunnies or Easter
Crafts 4 Eternity Challenge R#116 - Easter
4 Crafty Chicks Challenge 135 - Easter 
Make It Monday - Anything Goes


Monday, 25 March 2013

Box of Pink Roses

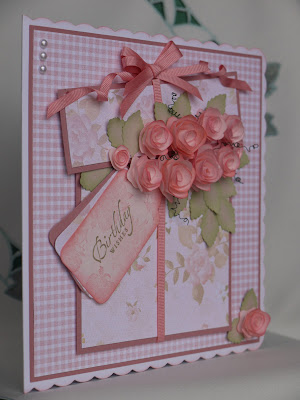
This is the card I've sent crafting buddy Lorraine who celebrates her birthday today.  I've been a bit cheeky as the design and layout comes from a birthday card which Lorraine herself sent me earlier this year so I've actually cased the card from her own card.  Being in a rolled roses phase this seemed another ideal way to use them.


The box topper on the front of the card is raised up on foam pads.  The parts of the lid which don't overlap the box are on double layer foam pads.  When the roses are added this makes quite a dimensional card as can be seen from the side view.

 
It was back to another addiction for the backing papers which came from the Nitwits Collection Thimbles n Threads.  Other embellishments used were self adhesive pearls, ribbon and coiled green beading wire which was attached  amongst the roses to create fronds.
 
The gift tags were cut using a Sizzix red die and then the top one was overstamped with a small Anna Griffin rose spray stamp before a sentiment stamp from the Stampin' up set Sincere Salutations was added using the aloe vera shade of ink.  The edges were then sponged with ink before the tags were layered up. 

After the roses were cut and rolled they were sponged with the pink shade of ink from the Brilliance Aurora pearlescent ink pad. The leaves for the roses were punched using an X-cut beech leaf embossing punch and then the edges were sponged with VersaMagic aloe vera chalk ink and the scalloped edges of the main card were sponged with VersaMagic pink petunia chalk  ink.


On the inside of the card the insert edge was masked off and decorated to match in the roses backing paper.  The small Anna Griffin roses spray stamp was inked using the VersaMagic aloe vera and pink petunia ink and stamped on to the masked off area and pink petunia ink was sponged in between the images.  The corners were rounded off before the edges were also sponged with ink.


Thanks for reading today and I hope Lorraine has a lovely birthday.
Liz xx

I'd like to enter this card in the following challenges

Sunday, 24 March 2013

Guitar Man

It's my brother-in-law's birthday today and this is the card I've made for him.  Something completely different and not a rose in sight.


The inspiration for this card came from this blog post by Deborah Wright and it was adapted to make a 21cm x21cm card.  Although as many Spellbinders dies as possible were used to make the parts for the guitar the body shape still had to be cut freehand and this is one of my crafting hates.  I have to confess that this was the second attempt.  After cutting the edge Stampin' up's crumb cake ink was sponged over it to add depth but mainly to camouflage the raw uneven edge.  Thick gold thread and gold brads were used for the strings and pegs of the guitar.


After completing the freehand cutting and camouflage another risky operation took place by adding a peel off sentiment.  Attaching peel off sentiments is a tricky business and I never seem to get the wording straight. The verse on the inside was created on the computer, printed on light weight cream parchment paper so that the music score still showed through and framed using Spellbinders nestabilities and grand nestabilities circle dies.


The grungy sheet music backing paper was a free download from Free Vintage Digital Stamps.  Unfortunately it had to be further distressed after a drop of water landed on the paper and created a big yellow blob where the ink had spread.  Further yellow blobs were added by splattering water on to the paper.  The card was then put away safely until it needed to be posted.

Thanks for reading today

Saturday, 23 March 2013

Another Pearl

This is another Pearl Anniversary card I've made recently but this card was an order from a friend and by coincidence the couple who it was for celebrated their anniversary on the same day as Carol and John whose card is in the previous post.


The materials and colour theme for this card is exactly as I used for Carol and John's card.  Once the roses were made I went around the inked edges with a Sakura clear glitter gel pen which gave them a dewy look.  A border of stitching was added to create another frame for the flower topper and silver elastic cord was knotted at the side.


Instead of being a Z fold the scalloped base card was left as it was so that a double insert could be added for family members to write their good wishes.  The corners of the smaller insert were punched using a Martha Stewart corner punch and the edges of both inserts were sponged with VersaMagic pink petunia chalk ink.

It's another cold and wintry day here but I'm off to have some fun at a card class at Carol's this afternoon.  We were to have met last weekend but due to illness Carol had to postpone the class.  She's going to have us make eight cards from a few sheets of A4 card.  Hopefully I won't get the shakes at not being able to add as many layers and embellishments as I normally do.

Hope you have a good weekend and thanks for reading today.
Liz xx

I'd like to enter this card in the following challenges

Friday, 22 March 2013

Thirty Years and still coming up Roses


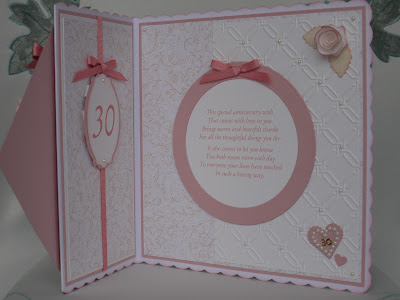
On the fifth of April our crafting buddy and Crafting Bee host Carol, and her husband John, celebrated their Pearl Anniversary and this is the card I made for them.  It's still that roses card but in a different colour theme.  Materials used and not listed in this posting can be found on this post.

   
Pink and cream were the colours chosen for this one and the roses were cut from cream card and sponged with VersaMagic pink petunia chalk ink. The leaves were punched from a light beige card and also sponged with the same ink as were the scalloped edges of the card.


The Spellbinders A4 M-Bossibilities folder Garden Lattice was used to emboss the panels and self adhesive pearls were added where the embossed lines crossed.  Self adhesive pearl hearts from Hobby House, which fit perfectly inside a Spellbinders heart die cut, were added to the corners of the card with the couple's initials and number of years married added inside.  The little hearts were punched using a small Woodware punch.  One of the first punches I bought.


The patterned paper comes from the Nitwits Collection Always and Forever.  I think their papers are becoming another addiction of mine.

Although Carol and John's anniversary fell on a Tuesday Carol still had us round for our Crafting Bee as usual so I decided to try and make some decorated cupcakes for us to have with our afternoon cuppa.


It's been a good number of years since I worked with ready to roll icing and I was rather ham fisted with the decoration even though it was just using a decorated roller and cutters.  The main thing was that they tasted okay.  I was delighted to find pearl balls in Tesco to decorate the cupcakes with which made them more appropriate to the occasion.

Thanks for reading today and I hope I haven't left you with your mouth watering.
Liz xx

I'd like to enter this card in the following challenges
Inky Impressions Challenge 102 - Flowers
Bearly Mine Challenge 78 - Anything Goes
Crafty Sentiments Challenge - Flowers Galore
LEJ Designs Challenge 45 - Add Flower/s
Crafty Boots Challenge - Flowers
Forever Friends Monthly Challenge (March) - Lots of Flowers
House of Gilli Challenge 51 - Anything Goes with Flowers and/or Ribbon
Love to Create Challenge 57 - Anything Goes
The Shabby Tea Room Challenge 158 - Anything Goes
Really Reasonable Ribbon Challenge RRR68 - Flowers and Ribbon

Thursday, 21 March 2013

Purple Roses

Back today with another of those roses cards but a change of colour theme this time.  This one was for Auntie Esther who also celebrated her birthday back in February.  Three Aunties in one month.


The roses were made from lilac parchment card from Southfield Stationers and sponged with purple Encore metallic ink and the leaves were punched from their green parchment card and sponged with VersaMagic aloe vera chalk ink.  Unfortunately these colours appear to be discontinued from their card range.


Apart from the colour change the tools and techniques used to make this card are the same as those used to make the card in this posting.  


The patterned papers used are from the Nitwit's Collection Time for Tea and once again some of panels were embossed using the Regency Swirls 8"x8" embossing folder from Crafter's Companion.  The light has caught the embossing best in the picture above.


Purple ribbon and self adhesive pearls from Hobby House were added as embellishments.

I hope you've enjoyed seeing this card in a different colour theme but unfortunately that's not the end of them  There are still more to come.

Thanks for reading today
Liz xx

I'd like to enter this card in the following challenges
Inky Impressions Challenge 102 - Flowers
Bearly Mine Challenge 78 - Anything Goes
Crafty Sentiments Challenge - Flowers Galore
Going Grey with Scrap Creations Challenge GGSC148 - Favourite Embellishment (Rolled Roses)
LEJ Designs Challenge 45 - Add Flower/s
Card Mania Challenge 16 - Lots of Layers
Crafty Boots Challenge - Flowers
Forever Friends Monthly Challenge (March) - Lots of Flowers
House of Gilli Challenge 51 - Anything Goes with Flowers and/or Ribbon
Love to Create Challenge 57 - Anything Goes
The Shabby Tea Room Challenge 158 - Anything Goes
Really Reasonable Ribbon Challenge RRR68 - Flowers and Ribbon

Wednesday, 20 March 2013

Happy and Sad


Yesterday I posted about Laura's sixteenth birthday card and today it is her Granny's birthday, the other Liz Miller in the family, and this is the card I've sent her.  The colour scheme and layout is similar to this card I made last month but a different patterned paper from the Nitwit Collection Time for Tea was used and the sentiment was stamped using a stamp from the Stampin' up Petitie Pairs stamp set and punched out using their oval and scalloped oval punches.


Liz had a sad start to this year as her Dad passed away and this is the card that was sent to let her family know we were thinking of them all.


The front panel is die cut using the Memory Box die Wild Blooms which cuts out a flower outline and leaves you with a negative image on your card.  I had seen this die used to make a sympathy card and decided it would be a useful one to have.  As well as being die cut the panel was embossed using a random dots embossing folder and the edges were sponged with Stampin' up's bashful blue ink.  The same ink was sponged around the scalloped edges of the card.  Their night of navy ribbon and a sentiment stamp from the Sincere Salutations stamp set was also used.

A blue spotted backing paper from Cuddly Buddly's download A Patchwork of Papers Blue was used along with navy card and silver mirri card.  Just a few navy self adhesive pearls were added as embellishments.


I'm not very good at making clean and simple cards or knowing when to stop with embellishments but hopefully I've got the balance right here so that this card was appropriate.

Thanks for reading today and welcome to Victoria who became a recent follower.
Liz xx