Wednesday, 1 July 2015

Wedding Gift for Elaine

I wanted to give Elaine a personal keepsake gift on her wedding day and selected a Sheila Fleet pendant from the Daisies for Emily collection. This was an item on her wish list but I also chose it because it was designed to help a very special young lady.  In the link below you can read about why the collection was created and how significant the humble little daisy is to the designer herself.


To add a personal touch to the gift I made a daisy themed faux book box to put it in. The measurements and instructions used to make it can be found on the blog I Wanna Build Me a Memory.

  
A daisy design paper from the Cuddly Buddly Yellow Country Cottage Collection was layered up along with shades of green and cream pearlescent card to make a base layer on the outside cover and the inside of the box. Attached across the front and back of the cover were layered strips of the same card selection and foam pads were used to add die cut hearts on top of these. The wording on the hearts was printed from the computer and then Spellbinder heart dies were used to cut them out.

Attaching the hearts using foam pads left a channel to hold the ribbon used to tie the box closed. The ribbon was also threaded through a diamante heart ribbon slider which was fixed to the spine to secure the ribbon to the box.


A pocket was made on the inside of the cover and this was to hold a set of layered tags.  After finding a daisy poem on the internet I tweeked it to personalise it for our gift and the occasion, printed it from the computer and cut it out using a set of Sizzix framelit tag dies.

   
On the opposite side was the framed space to put the gift in. To link it to the words in the poem the message “He Loves You” was added to the back of the space and underneath where the gift would be. Daisy patterned strips were used to frame the space, and also to hide the joins of the concertinaed sides, and they were given a decorative edge using Martha Stewart's doiley lace border punch.  A border was added to the frame using thin strips of the dark green card.


Different sizes of Woodware punches along with Joanna Sheen's rose leaves die were used to make the daisy embellishments. After overlapping and gluing two of the daisies together the edges of the petals were sponged with pale green ink and a flat backed pearl was added to the centre. Continuing with the daisy theme the pocket holding the tags was embossed with a daisy patterned embossing folder.
 
Elaine was delighted with her daisy pendant and wore it everyday whilst on honeymoon. This is my favourite photo of her wearing it and below that is a photo collage Elaine made showing most of the Sheila Fleet jewellery which played a part in their wedding day.  As a thank you gift from Elaine and Andy I received a necklet, which you can see me holding in the bottom right of the collage, and Andy's mum received a brooch.  Both were from the Snowdrop Collection.


This really is the last post about bits and pieces I made for Elaine's wedding. I hope you have enjoyed reading about them as much as I have enjoyed making a written record of them.

Thanks for reading today.

Sunday, 28 June 2015

Wedding Card for a Sister

The last wedding card I made was one for Ian to give his sister and her new husband and it was back to my favourite nine square layout.  There was lots of bling on this one with not a hint of green in sight.

 
White and silver linen, silver mirri, dufex silver heart and silver wedding script card were cut and layered to make the different tiers for this card. The bottom and middle tiers were made by layering up the cardstock with a grid of nine 5cm squares embossed on the top of the middle layer. I was introduced to the Scor-Bug Embosser recently and this little tool can create faux stitching lines, which can still be stitched, in seconds. On this card I left them as embossed lines. White grosgrain ribbon was wrapped around two corners of the bottom tier before the middle layer was added on top and held in place using silver brads.

   
The top tier was the nine little toppers. Squares of the different types of card were cut and layered using Woodware square punches and Spellbinder dies and silver thread was wrapped around the corners of five of the toppers. Embellishments added to the toppers were pearl, diamante ribbon slider and silver peel off hearts along with silver wedding and engagement ring charms and peel off dots. The sentiment and Elaine and Andy's names were printed from the computer and die cut and layered using Spellbinder heart and square dies.  A white grosgrain bow was added to the top left corner of the middle tier.

 
When looking for a suitable verse to print on the insert I came across this one which fitted the bill perfectly.

I cherish all the good times
that we've had throughout the years,
they've been peppered by the tough times
when we dried each other's tears,
and while the future is unknown,
I can plainly see,
I'll always be there for you,
just as you'll be there for me.
 
I also made a matching wallet for Ian's gift card.


Just one more wedding piece to write about and then normal service will be resumed.

Thanks for reading today

Thursday, 25 June 2015

Wedding Card for the Newlyweds

As well as making individual wedding cards for Elaine and Andy I also made a card for them as a couple. Shades of green pearlescent card and the Nitwit Collection patterned paper used in printing the wedding invitations were also used to make this card. Panels, made from layering up the coloured and patterned card, were attached to faces of the z-fold card and a stitched border was added to each of the top layers to add an extra frame.

  
The tiers of the wedding cake topper were made from rectangles of white Crafter's Companion centura pearl card which had their top corners rounded before being embossed using a swirls embossing folder. The pieces were backed on to the dark green card to leave a quarter centimeter border around the sides and top.  Green ribbon was wrapped around each piece before they were attached to each other.
 
Foam pads were used to attach the cake to the backing panel and ribbon bows were added to each tier.  The double layered trailing ivy was cut using a die from the Marianne Creatables Ivy die set LR0206 and attached to the ivy are green paper roses and cream and green rose buds. Self adhesive pearls were added amongst the roses.

Elaine and Andy's initials were printed from the computer and die cut and layered using Spellbinders plain and scalloped hearts dies.  This made up the cake topper. When using both Elaine and Andy's initials together on wedding items we always made sure to put Elaine's initial first so as to avoid any A & E jokes. The sentiment was also printed from the computer and punched out using Stampin' up oval punches.  Hanging hearts were die cut using a Memory Box die, layered up and attached to the corner of the base panel.


Attached to the inside of the card was a printed verse which was framed and die cut using Spellbinder square dies. On the opposite flap the couple's names and date of marriage were printed on to card and die cut and layered using Spellbinder heart dies. Smaller die cut hearts, silver peel off hearts and silver brads and green ribbon were added as embellishments.


A verse about marriage was printed on to the top layer behind the Z-fold with silver peel off wedding rings added as an embellishment.


The box for the card was decorated with layered up hearts as in the inside of the card.


Thanks for reading today

Wednesday, 24 June 2015

Wedding Card for Andrew

As well as making a card for Elaine I wanted to give Andy, the groom and our future son-in-law, a card to wish him well on his wedding day and to welcome him in to our family.  Whilst browsing on Pinterest for card ideas I've seen wedding cards made using decorated die cut heart shapes or die cut bows in black and white to represent the bride and groom and this was where my inspiration for Andy's card came from.


I knew that Andy would be wearing his kilt to get married in so to have the tartan of his kilt included on the card I Google searched for a picture of it to download.  This is the Fraser Ancient Hunting tartan chosen by the men in the family to wear because Andy's mum's maiden name is Fraser.  Along with his kilt Andy would also be wearing the Prince Charlie style jacket, with black waistcoat and bow tie, so layered die cut heart shapes were decorated to represent this.  The bow tie was die cut using Sue Wilson's Itty Bitty Bow die without the tails.

The green card and ribbon used in making the wedding stationary were also added to the card along with a silver script wedding backing paper.  Silver brads were added to represent the silver buttons on the jacket and waistcoat.

This verse was added to the inside of Andy's card.

During the time we've known you
we've watched Elaine's heart be won
and now that you're marrying our Daughter
we're so glad that you're the one.

We couldn't ask for any more
than the love you send her way,
we'll be proud to have you as family
as you marry our Daughter today.

We're thankful she's found the man she loves,
the person to share her dreams,
today our Daughter becomes a wife
and we're proud of the son that this brings. 
  
Here's a lovely photograph of Andy, his dad and his brother on the wedding day looking very dapper in their highland dress. 


After finding out about the Scottish tradition, that following the exchange of vows and rings the groom often pins a sash of his clan’s tartan to the bride’s wedding dress to signify that she is now a member of his clan, Elaine had a wrap made from the Fraser Ancient Hunting tartan to use on her wedding day. The lovely weather on the day meant there was no practical need for it and the opportunity to use it as a photography prop was also missed.  To make up for this it was well used on their honeymoon and was also photographed several times as this lovely photo collage which Elaine put together shows.


Thanks for reading today

Monday, 22 June 2015

Elaine's Wedding Day Card

Elements from the wedding stationary were used on the card I made to give Elaine on her wedding day. The backing paper from the Nitwit Collection Petalfresh along with cream and dark and pale green pearlescent card were used to make up the layers and lots of paper flowers were added as embellishments.


Three layers of card made up the base for the front of the card. The edges of the middle layer were distressed and the top layer of card was embossed using the Crafters Companion Regency Embossalicious folder. Attached across this base were layered up strips of card with green ribbon and ribbon sliders wrapped around them. The edges of the bottom strip were die cut using a Marianne stitching border die and the edges of the middle layer were distressed.
 
Added on top of the layered strips was the sentiment which had been printed from the computer, die cut using a Spellbinders circle die and backed on to a layer of cream card die cut using a Marianne stitching die. This stitching die matched the border die which had already been used and dark green thread was used for the stitching on both these pieces.


Lots of paper flowers in shades of cream and green were arranged around two of the corners of the card. Dazzling diamonds glitter from Stampin' up was added to the cream ones and also to some of the cream leaves which had been cut using a Marianne die. I didn't have dark green rosebuds to use so a green Promarker pen was used to colour cream ones. When holding the chisel end of the pen against the mulberry buds they soaked up the ink from the pens perfectly.

Before gluing the flowers to the card a pearl crown and two teardrop stick pins were attached underneath with their sharp ends embedded in foam pads. Once the pins and die cut leaves were in place the flowers were arranged and glued on top.  The stems of the roses were coiled around a knitting needle.


Other embellishments added were the love bird punch outs, diamantes, pearl brads to two corners of the card and lots of self adhesive pearls around edges of layers and amongst the flowers.


A double layer insert of cream pearlescent paper and pale green parchement paper were added to the inside of the card.  This verse was printed on the inner layer. 

Today dear daughter, as you walk down the aisle
You will see all the faces wearing a smile,
But as we remember those young tender years
Our smiles will conceal a few hidden tears.
It is not through sadness, just emotions awhirl
As we both think back to a dear little girl,
And now you have grown and made us so proud
As you smile for the camera and the rest of the crowd.
Remember Elaine, as you become Andrew's wife,
You are still very much a part of our life,
We're not losing a daughter, but gaining a son,
Your new life as husband and wife has begun.

To protect the card I made a box and decorated it to match the card front.  A friend of Elaine's came along to photograph moments of us getting ready on the wedding day and she used this box as a prop to photograph Elaine's engagement ring.

Thanks for reading today

Friday, 19 June 2015

Wedding Stationary - Part 3

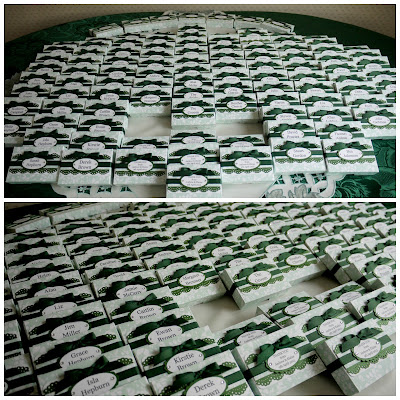
The last piece of wedding stationary to write about is the favour box/place setting.  At Christmas time it's become a tradition that we have fudge made to the recipe of a school friend's mum. Elaine is carrying on this tradition and she and Andy also made and boxed up fudge to make wedding favours for friends. Elaine decided that she wanted to do the same for their own wedding so I made up the boxes and Elaine and I made the nine batches of fudge needed to fill them. As well as each of the guests having a box of fudge, chocolate buttons for the little ones, extra boxes were made to give out to those who helped in various ways on the wedding day.

 
The lids of the boxes were made from card printed with the same Nitwit Collections backing paper as was used for the invitations and the inside of the box base was lined with either dark green pearlescent paper for the gentlemen or light green parchment paper for the ladies. This used up lots of the scrap paper created from crafty mistakes along the way.  Making all the lids and bases for these boxes was made a lot easier using my trusty Scor-pal to do all the scoring.

The box and lid were held together by a name label attached to a length of ribbon. The ribbon was threaded through a ribbon slider at the back of the box to keep it all securely in place.  As well as each guest having their own keepsake box to take home if they wanted, the boxes were also used as place setting names and decoration for the dining tables. The table was also decorated with punched out love birds which had been an embellishment used on other pieces of the stationary and this was another way of using up pieces of scrap paper. The love bird theme carried over to their wedding cake as Elaine found a cute little ornament of two love birds which sat on the top tier.


Once the boxes, wraps and fudge were made the next task was to put it all together. The first stage was putting six pieces of fudge in to self sealing ATC bags and Alan helped me with this task.  At the end of it he decided that he wasn't cut out for the monotony of repetition work.  The pictures below show everything set out ready to put together.


Next the packets of fudge were put in the boxes and a name or thank you wrap attached to each. The whole process took most of a day and, although there was a lot of work involved in the making and filling of the favour boxes, it was satisfying to lay them all out and photograph at the end.


The last four posts have covered the wedding stationary for Elaine and Andy's wedding.  Next to come are the wedding cards I made for them.

Thanks for reading today

Wednesday, 17 June 2015

Wedding Stationary - Part 2

As well as the cream cardboard boxes used for holding stationary items a wicker basket and hamper were also used.  The hamper basket was set out for guests to put their wedding day cards in and was decorated with green grosgrain ribbon, paper flowers and bunting made using X-cut nesting dies.  A matching luggage label was made using Sizzix thinlits dies and attached to the handle of the basket.  Luggage labels were also used to decorate our dressing gown coat hangers and the confetti basket.


The wicker basket was used to hold little cartons of confetti which were given to guests as they left the church.  A Stampin' up Sizzix die was used to make up these little cartons from card printed with the same Nitwit Collections backing paper as the invitations and each were filled with biodegradable natural petal confetti.  More paper flowers and green ribbon decorated the handle of the basket along with the confetti labels.


The dining tables were each given a wild flower name and Elaine made heart shaped labels to tie to the flower jars on the dining tables using her own photographs of each one.  The top table was primula scotica, which was no surprise, seeing as it was the elusive little flower she had managed to see on the holiday when she and Andy became engaged.

  
I used these same photographs to decorate the seating plan board which added a lovely splash of colour.  The board itself was Elaine's old peg board so we did a little bit of upcycling in the process.  Spellbinders oval and heart dies were used to cut out the different layers and green ribbon, diamante hearts and paper flowers were added.  The decorative edge around the board was made using off cut or reject pieces from other projects with ribbon pleated over the top.


There's just one piece of stationary left to write about and it makes a little story of its own so I'll save that for the next post.

Thanks for reading today

Monday, 15 June 2015

Wedding Stationary - Part 1

There were usually a few pieces of Elaine and Andy's wedding stationary being made at the same time which helped with the monotony of batch making. Having watched two craft friends make wedding stationary I knew that there would be a lot of repetition work involved. Chopping and changing between pieces also meant that when a decision had to be made about one of them, such as wording, then the production line could keep moving forward with something else until that decision was made.


The Order of Service cards matched the invitations and they too had the dark green lining paper and the wording printed on pale green parchment paper.  Once finished they were stored, ready to take to the church, in a large cream gift box which was decorated with dark green grosgrain ribbon. Our local card shop had a range of different sizes of these cream boxes so a few were bought and decorated for various purposes on the day.


Two boxes were used for the wisdom and wishes cards. The smaller box held the cards and pens for guests to write their good wishes and advice on and the larger box was the posting box for the cards.  Along with their wedding day cards they took these wisdom and wishes cards away to read on their honeymoon and Elaine intends to scrapbook them all later. The larger box is now being used as a keepsake box so the posting hole has been sealed up with layers of acetate attached above and below the hole cut in the lid and silver heart confetti is trapped  between the two layers of acetate to make a shaker window.


Another box was used to store photographer information cards for guests to take away with them. These cards were put together by Elaine and Andy using photos from their engagement shoot and printed on each one was the password guests would later need to view their wedding photos. Blank DVDs were also made available for guests to take home with them so that they could send Elaine and Andy photos they had taken of the day. Sometimes guests can catch magical moments which go unnoticed by the bridal party. Card envelopes for the DVDs were printed and addressed to match the stationary.


Andy had also put together a photo book for guests to look at which included lots of photos of themselves, and of their friends and family, which recorded special events and holidays since they had become a couple.  Photography is important to Elaine and Andy as it was at a local photography class that they had first met.  To celebrate this they each had a photo board with a selection of their favourite photographs on display for guests to view.


More to come in part 2.

Thanks for reading today
Liz xxx

Friday, 12 June 2015

Wedding Invitations

Before I got back from Orkney lots of decisions had been made regarding the wedding including the wedding date which had been set for 9th April 2015 which meant there were nine months left for planning. Elaine had decided that the bridesmaids dresses were to be green so that became the colour theme for all the stationary items too.

Elaine had in mind an invitation which would have the invite wording on the front of an opening card with an information sheet attached to the inside. My Craft Studio and a patterned sheet from the Nitwit Collection Petal Fresh were used to create the card base. Attached to that were a strip of dark green pearlised paper which had been punched using the Martha Stewart Doily Lace border punch, a strip of the patterned paper on top of that and wrapped around the layered strips and base card was green grosgrain ribbon with a matching bow added on top. Love bird punch outs from the green pearlised paper and crystal gems were added amongst the wording.

The inside of the card was lined with dark green pearlised paper and pale green parchment paper was used for printing the information sheet. The corners of the base card and insert sheets were rounded off using a corner punch. Once we had the design for the invitation sorted it became the basis for other pieces for the day.

Here are some images of the completed day and evening invitations.


Thanks for reading today
Liz xxx